

Term 4 Science Equipment Checklist: Get Your Classroom Ready
October 5, 2026

Term 4 Science Equipment Checklist: Get Your Classroom Ready
Term 4 brings another round of practical investigations, revision activities and student projects. Preparing complete equipment sets helps students spend more lesson time observing, measuring and testing their ideas.
At Wiltronics, we’ve put together this practical checklist to help teachers and laboratory technicians check existing equipment, calculate class quantities and identify useful additions to their science resources.
Start with the lessons you plan to teach. Assemble one complete working station for each activity, then use it to check what the whole class needs.
1. Match your equipment to the learning objective
An equipment list becomes more useful when it starts with what students will actually do.
For each planned practical, identify the learning objective, group size and evidence students will produce. This might be a scientific drawing, a results table, a circuit diagram or an explanation supported by measurements.
| Teaching task | Equipment considerations | Preparation question |
|---|---|---|
| Build and compare circuits | Suitable power sources, lamps, holders, wires and connectors | Can every group assemble the planned circuits? |
| Observe biological specimens | Microscopes, selected slides and recording materials | Do groups need identical specimens or a rotation? |
| Measure liquid volumes | Measuring cylinders, collection vessels and trays | Are the capacities and graduations appropriate? |
| Compare samples | Suitable tubes, racks and identification materials | Can samples remain organised throughout the activity? |
| Collect and compare data | Instruments with suitable ranges and resolution | Can students make meaningful measurements with the available equipment? |
A lesson focused on microscope observation may use prepared slides. A lesson focused on specimen preparation requires additional materials and preparation time.
Likewise, demonstrating one circuit to the class requires fewer components than having ten groups investigate independently.
2. Calculate complete class quantities
For a class of 30 working in groups of three:
30 students ÷ 3 students per group = 10 working stations.
Multiply each station’s requirements by ten. Add teacher demonstration equipment and suitable spares separately.
The example below shows how this works for a teacher-designed water-volume activity. It is a planning example, rather than a prescribed lesson or product bundle.
| Item | Per station | For 10 stations | What to check |
|---|---|---|---|
| Measuring cylinder | 1 | 10 | Capacity and scale divisions suit the task |
| Water collection beaker | 1 | 10 | Sufficient capacity for the activity |
| Equipment tray | 1 | 10 | Holds the complete station |
| Individual recording sheet | 3 | 30 | Matches the measurements students will make |
| Teacher demonstration set | Separate | 1 additional set, if needed | Available while students use their stations |
Calculate consumables across all participating classes. Reusable equipment may serve several lessons, while disposable materials or samples may need replenishment each time.
Consumables calculation: quantity per group × number of groups × number of sessions requiring fresh materials.
Choose spare quantities according to the item’s condition, frequency of use and importance to the lesson. Prioritise small components whose failure would stop a group from working.
3. Check that the equipment works together
A cupboard can contain enough individual items without providing enough complete stations.
Before preparing the full class set, check the connections, dimensions and operating requirements of your trial setup.
| Equipment area | Practical checks |
|---|---|
| Circuits | Lamp ratings, holders, connector compatibility, lead condition and power source |
| Microscopy | Illumination, focus controls, selected specimens and slide availability |
| Liquid measurement | Capacity, readable graduations, material suitability and vessel condition |
| Test-tube activities | Tube diameter, rack fit and stability |
| Digital equipment | Power, cables, software access and classroom-device compatibility |
| Shared instruments | Location, availability and likely waiting time |
Follow your school’s procedures and the equipment instructions when checking condition and suitability. Set damaged items aside for assessment rather than counting them as available equipment.
Photograph the completed station or prepare a short inventory card. This gives staff and students a consistent reference for setup and pack-down.
4. Equipment highlights for your Term 4 lessons
Our range includes complete kits, individual apparatus and accessories that help schools put existing equipment to work.
Circuit investigations: IEC Circuits Kit
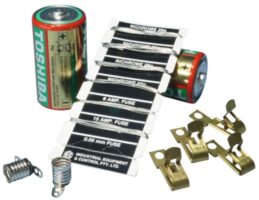
Our IEC Circuits Kit—EM0970-001 provides apparatus for exploring basic electrical concepts.
The listed contents include two small lamps with sockets, two dry cells, four Fahnstock clips and a selection of copper and resistance wires.
When preparing existing kits, check each set against its contents and confirm that lamps, cells and connections work. Use the supplied instructions to select activities appropriate to the students and lesson.
A consistent starting setup helps students investigate the intended concept without missing components interrupting their work.
Microscopy: Prepared Biology Microscope Slides
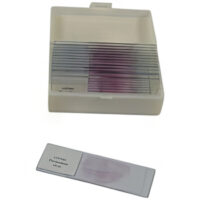
Our Prepared Biology Microscope Slides—Set of 25 includes labelled specimens and a storage case. The contents include Spirogyra, onion root tips and a variety of tissue preparations.
Prepared slides allow students to focus on observation, identification and scientific drawing without first preparing specimens.
Check the contents against your learning objective and students’ experience. Also consider how groups will access each specimen: a set of 25 different slides does not provide 25 copies of the same slide.
For a shared investigation, you may need duplicate specimens. For a comparison activity, a planned rotation may make better use of the variety.
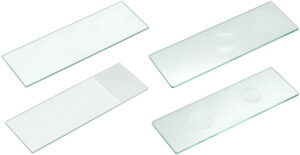
Our microscope slides and equipment range provides additional options for slide preparation and storage. If you are reviewing the microscopes themselves, read our School Microscope Buying Guide to compare instruments for different observation tasks.
Liquid measurement: TPX 25mL Measuring Cylinder

Our TPX Plastic Measuring Cylinder with Spout and Base has a listed capacity of 25mL, a pouring spout and a hexagonal base.
It is an option for activities involving small liquid volumes. Check the scale divisions and required measurement tolerance before selecting your class quantity.
Match the material to the liquids and cleaning methods you intend to use. Suitable measuring equipment helps students produce useful results and explain differences between trials. www.wiltronics.com.au
Sample handling: Test Tube Rack for 20 × 18mm Tubes
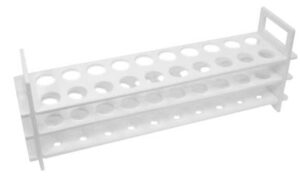
Our Test Tube Rack—20 × 18mm Tubes features polypropylene construction and a five-piece clip-together design.
It holds up to 20 tubes of the specified 18mm diameter. Check your existing tubes before ordering: rack capacity and supported tube diameter are separate specifications.
For activities involving several samples, allow enough space to keep tubes organised during observation, comparison and collection.
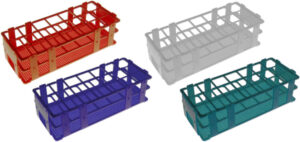
We also offer test-tube racks in other sizes for different apparatus.
Restore incomplete sets with replacement parts
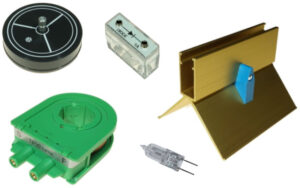
Before replacing an entire apparatus, identify the missing or damaged component.
Our IEC spare parts range includes dedicated categories for different equipment, including IEC Circuits Kit spare parts.
Record the equipment model and required part before ordering. Confirm dimensions, ratings and connections where relevant; similar appearance alone may not establish compatibility.
5. Prioritise purchases around planned lessons
Separate immediate requirements from additions that support later activities.
| Priority | What belongs here | Example |
|---|---|---|
| Needed for the next practical | Missing or unsuitable items that prevent the activity from proceeding | Replacement lamps or correctly sized racks |
| Improves student participation | Equipment that reduces waiting or excessive sharing | Additional measuring instruments or duplicate slides |
| Supports later lessons | Equipment tied to confirmed activities later in the term | A new kit or expanded class set |
Calculate orders from the quantity of usable equipment, excluding items awaiting repair or assessment.
For time-sensitive activities, confirm availability and delivery arrangements before relying on newly ordered equipment.
6. Plan collection and reset
Include pack-down time in the lesson plan.
Give each station an inventory card and an assigned return location. Identify who will check, clean and reset the equipment, and separate used items from clean equipment where appropriate.
Consider consecutive classes. One set may serve several classes during the day, but only if the timetable allows enough time to prepare it between lessons.
Record faults clearly. “Station 4: lamp failed during setup” gives the next person a useful starting point and helps prevent the same problem interrupting another class.
Your Term 4 science preparation checklist
- Confirm the activity and learning objective.
- Calculate the number of working groups.
- Assemble and check one complete station.
- Count complete, usable sets.
- Check component sizes, ratings and compatibility.
- Calculate consumables across participating classes.
- Allow for demonstration equipment where required.
- Identify appropriate spares.
- Check relevant instructions and school procedures.
- Prepare recording sheets and station inventories.
- Plan collection, cleaning and reset time.
- Confirm availability for outstanding purchases.
Frequently asked questions
How many equipment sets do we need for a class of 30?
Ten sets provide one station per group of three. Choose group sizes according to the activity, available space and the amount of individual practical work students need to complete. Include a separate demonstration set if the teacher needs one during group work.
Should we purchase complete kits or individual components?
Complete kits can provide a consistent starting setup. Individual components may suit schools with mostly complete equipment. Compare the contents and compatibility with what you already own before deciding.
Does a prepared slide set let every group examine the same specimen?
Not necessarily. Sets containing different specimens provide variety rather than multiple copies of one specimen. Check the contents and plan duplicate slides or a rotation to suit the activity.
How much spare equipment should we keep?
There is no single percentage suitable for every lesson. Consider condition, frequency of use and replacement availability. Give priority to components whose failure would prevent a station from operating.
Can we share one class set between several classes?
Yes, where the timetable allows enough time for collection, cleaning, checking and reset. Calculate consumables separately for each class requiring fresh materials.
Prepare for Term 4 with Wiltronics
Explore our laboratory hardware and consumables, electricity equipment, microscopes and accessories and IEC spare parts when preparing your practical lessons.
Whether you need to complete an existing kit, improve student access to equipment or prepare a new investigation, match your purchases to the activities you plan to teach.
© Electrotech Brands Pty Ltd 2026
Write a Comment
You must be logged in to post a comment.