

STEM Energy Transformation Experiments for Schools
August 31, 2026
STEM Energy Transformation Experiments for Schools
These investigations move the lesson beyond memorising lists of energy types. Students can make predictions, control variables, collect voltage and current measurements, calculate power, identify energy losses and improve a design.
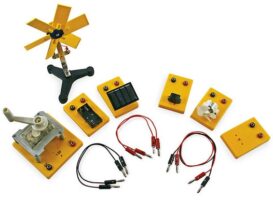
The Energy Conversion Kit provides a practical starting point. It combines wind, solar, hand-crank and battery modules with an LED, buzzer and small fan, allowing one classroom resource to demonstrate several energy pathways.
This guide develops those demonstrations into a sequence of inquiry-based STEM activities for upper-primary and secondary classrooms.
Energy transfer and energy transformation: what is the difference?
The terms describe related but different processes.
- Energy transfer occurs when energy moves from one object, place or system component to another.
- Energy transformation occurs when energy changes from one form to another.
Turning a hand generator demonstrates both. Chemical energy in the student’s body supports muscle movement. The hand transfers mechanical energy to the crank. The generator transforms mechanical energy into electrical energy. An LED then transforms part of that electrical energy into light, while other parts of the system release thermal and sound energy.
A useful classroom rule is: identify the system, trace the energy pathway and account for the outputs.
Students should avoid saying that a device “uses up” energy. The system converts and transfers energy, but the total energy remains conserved. Some energy spreads into the surroundings in forms that become less useful for the intended purpose.
Curriculum connection
The Australian Curriculum: Science develops students’ understanding of energy through motion, heat, sound, light and electricity. In Version 9.0, Year 8 content descriptor AC9S8U05 asks students to classify energy as kinetic or potential and investigate energy transfers and transformations in simple systems.
These activities can also support:
- planning and conducting fair tests
- selecting and controlling variables
- recording measurements with correct units
- representing systems with energy-flow diagrams
- graphing and interpreting data
- evaluating uncertainty and experimental limitations
- designing and improving solutions
- discussing renewable-energy generation and sustainability
Teachers can simplify the tasks for younger students by emphasising observation, sequencing and labelled diagrams. Senior students can calculate power, energy and efficiency and evaluate the limits of the model.
Quick experiment and equipment selector
| Learning objective | Recommended activity | Core equipment | Evidence students produce |
|---|---|---|---|
| Identify energy pathways | Hand crank to LED, buzzer and fan | Energy Conversion Kit | Labelled flow diagram |
| Conduct a fair test | Change solar-panel angle | Energy Conversion Kit; digital multimeter | Results table and graph |
| Compare renewable inputs | Test solar and wind conditions | Energy Conversion Kit | Controlled-variable investigation |
| Calculate electrical power | Measure voltage and current | Digital multimeter; compatible leads | Power calculation and comparison |
| Compare motors and generators | Lift and recover a mass | IEC Motor/Generator Kit | Evidence-based explanation |
| Complete an engineering challenge | Build and improve a working model | Solar Rover or solar hydraulic robot | Prototype, test data and evaluation |
The Energy Conversion Kit at a glance
The Wiltronics kit includes:
| Component | Input or stored energy | Observable output |
|---|---|---|
| Wind-power fan | Moving air | Electrical energy |
| Hand-crank generator | Mechanical movement | Electrical energy |
| Solar panel | Light | Electrical energy |
| Battery module | Stored chemical energy | Electrical energy |
| LED | Electrical energy | Light and heat |
| Buzzer | Electrical energy | Sound and heat |
| Small fan | Electrical energy | Movement, sound and heat |
Because students can connect different sources to different outputs, the kit supports comparison rather than a single fixed demonstration. They can ask whether every source operates every load equally well, why output changes and how the energy pathway affects performance.
The kit supports immediate qualitative demonstrations. Add a compatible multimeter when students need numerical voltage, current or power comparisons.
View the Energy Conversion Kit.
Experiment 1: map the energy pathway
Learning goal
Identify transfers and transformations within a working system.
Method
Connect the hand-crank generator to the LED. Ask one student to turn the crank slowly, then faster. Repeat the demonstration with the buzzer and fan.
Students draw an energy-flow diagram for each setup. A suitable hand-crank-to-LED pathway is:
chemical energy → mechanical energy → electrical energy → light and thermal energy
Questions for students
- Which components transfer energy?
- Which components transform it?
- What changes when the crank turns faster?
- What evidence suggests that the system produces heat or sound as well as the intended output?
- Does the generator create energy? Explain your answer.
Extension
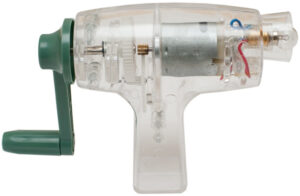
Use the Hand Held DC Generator with a maximum listed output of 6.3V and 1.2A. Its transparent housing helps students connect crank movement with generator operation.
Experiment 2: compare solar output at different angles
Learning goal
Conduct a fair test to investigate how panel orientation affects electrical output.
Variables
- Independent variable: angle between the panel surface and the light source
- Dependent variable: measured voltage, current or load performance
- Controlled variables: light source, distance, panel, circuit, measurement interval and ambient conditions
Method
Position the kit’s solar panel at a series of measured angles. Record the output at each position. If students use an artificial lamp, keep the panel at a safe distance and monitor heat. Do not look directly into high-intensity light sources.
For a qualitative activity, students can compare LED brightness or fan speed. For a stronger investigation, use the Economy Digital Multimeter to record electrical measurements.
Students can graph panel angle on the horizontal axis and output on the vertical axis. They should describe the pattern before explaining it.
Improve the investigation
Repeat each measurement and calculate a mean. Ask students to explain why brightness alone provides weaker evidence than a numerical measurement.
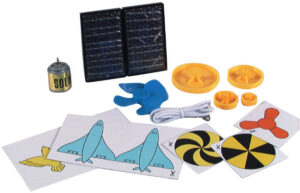
The Solar Educational Kit provides another accessible solar-powered construction activity, while the 6-in-1 Solar Model Kit lets students compare how a common energy source performs across different model designs.
Ready to move from observation to evidence? Pair the Energy Conversion Kit with the Economy Digital Multimeter for measurable solar and wind investigations.
Experiment 3: investigate wind speed and generator output
Learning goal
Relate the movement of air to the electrical output of a generator.
Method
Direct a suitable classroom fan towards the wind-power module. Test several fan settings or distances while keeping all other variables consistent. Measure voltage at each setting or compare how reliably the source operates the LED, buzzer and small fan.
Students should not place fingers or loose materials near moving blades. Switch off the air source before adjusting the apparatus.
Questions for analysis
- How does output change as the air movement increases?
- Does doubling distance halve the output?
- Which variables were difficult to control?
- Why might a real wind turbine produce variable power during a day?
- How could energy storage make intermittent generation more useful?
This activity introduces an important distinction: a renewable source may remain available over long periods without delivering constant power at every moment.
Experiment 4: measure voltage, current and power
Learning goal
Move from observing an effect to quantifying electrical energy transfer.
Voltage and current describe different parts of a circuit’s behaviour. Voltage represents electrical potential difference, while current measures the rate of charge flow. Calculate electrical power using:
Power (W) = Voltage (V) × Current (A)
Students can measure the voltage across a compatible low-voltage load and the current through the circuit, then calculate power. A teacher should demonstrate correct meter connection before students begin:
- connect a voltmeter in parallel
- connect an ammeter in series
- select the correct function and range
- place leads in the correct meter sockets
- switch off or disconnect the circuit before rearranging it
- use only approved extra-low-voltage classroom sources
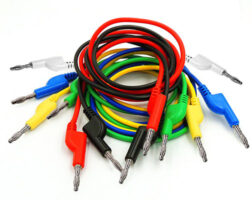
The Economy Digital Multimeter suits introductory student measurement. Stackable 4mm banana-plug test leads can support repeatable low-voltage laboratory connections where the equipment uses compatible sockets.
Data table
| Source | Voltage (V) | Current (A) | Calculated power (W) | Observation |
|---|---|---|---|---|
| Hand crank: slow | ||||
| Hand crank: fast | ||||
| Solar panel: direct | ||||
| Solar panel: angled | ||||
| Wind: low setting | ||||
| Wind: high setting |
Students should not assume that the source with the highest open-circuit voltage will deliver the greatest useful power under load.
Worked power calculation
Suppose students measure 2.4V across a small fan and 0.15A through the circuit:
Power = 2.4V × 0.15A = 0.36W
If a second source operates the same fan at 1.8V and 0.12A, it delivers:
Power = 1.8V × 0.12A = 0.216W
Under these measured conditions, the first source delivers more electrical power to the fan. Students should report the operating conditions and measurement uncertainty rather than treating either result as a permanent rating.
Experiment 5: motor versus generator
Learning goal
Investigate reversible energy transformations.
A motor transforms electrical energy into mechanical movement. A generator transforms mechanical movement into electrical energy. Many classroom DC motors can illustrate both principles, although performance differs between the two operating modes.
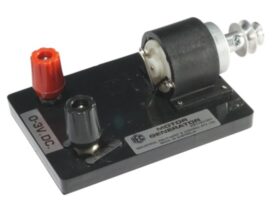
The IEC Motor/Generator Kit with Pulley allows a motor to lift a mass and then uses the descending mass to drive the motor as a generator. Students can compare electrical work, gravitational potential energy and recovered electrical output.
Ask students to predict whether the system will recover all the energy originally used to lift the mass. They can identify losses caused by electrical resistance, bearing friction, belt or cord movement, sound and air resistance.
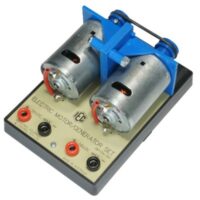
The IEC Motor/Generator Belt Drive Set supports linked motor-generator demonstrations, while the IEC Hodson Electric Motor Kit lets students construct the motor itself and investigate how its armature, brushes and magnetic field produce movement.
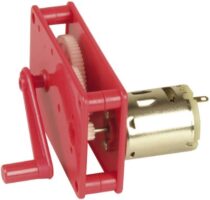
For compact design projects, the Hand Crank Dynamo with Geared Motor generates DC voltage and allows students to investigate how cranking speed affects output.
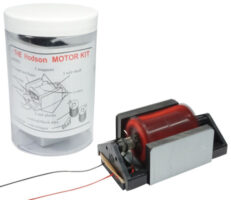
Compare the IEC motor-generator apparatus and Hodson Motor Kit when planning a class set: the first emphasises work and energy recovery, while the second emphasises motor construction and electromagnetic operation.
Experiment 6: compare loads
Learning goal
Explain why different output devices respond differently to the same source.
Connect the same energy source to the LED, buzzer and fan one at a time. Students record the minimum input needed to produce an obvious response.
Possible observations include:
- an LED may illuminate before the fan begins to turn
- the buzzer may change tone as input changes
- the fan may require enough starting torque to overcome friction
- rapidly changing the crank speed may produce unstable output
Students should avoid ranking devices by “how much energy they use” from observation alone. The activity reveals different operating requirements; measurement provides the evidence needed for quantitative comparison.
An advanced group can calculate power for each load and measure it under comparable conditions.
Experiment 7: design an energy system
Design brief
Create a small system that uses an available energy source to produce a useful output. The system must operate reliably, minimise unnecessary energy transformations and communicate its energy pathway clearly.
Students might design:
- a hand-powered emergency light
- a solar-powered ventilation model
- a wind-powered warning indicator
- a stored-energy system that operates when the source becomes unavailable
- a model vehicle that uses solar energy
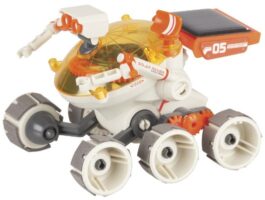
The Solar Rover Kit provides a six-wheeled application, while the 12-in-1 Solar Hydraulic Robot Kit combines solar power, hydraulic mechanisms and interchangeable builds.
Design criteria
Students should:
- identify the input and desired output
- draw the proposed energy pathway
- define a measurable success criterion
- build and test the system
- record failures and unexpected behaviour
- change one design variable
- compare the revised result with the original
This turns a demonstration into an engineering process. A successful project should include evidence of improvement, not merely a completed model.
A five-lesson classroom sequence
| Lesson | Main activity | Key concepts | Student outcome |
|---|---|---|---|
| 1 | Map hand-crank energy pathways | Transfer, transformation and conservation | Labelled energy-flow diagrams |
| 2 | Compare solar and wind variables | Fair testing and renewable generation | Results table and graph |
| 3 | Measure voltage, current and power | Electrical measurement and calculation | Quantitative source comparison |
| 4 | Investigate motors and generators | Reversible transformations and losses | Explanation supported by observations |
| 5 | Complete an energy design challenge | Criteria, testing and iteration | Working model and evaluation |
Teachers can run the sequence as five individual lessons or expand it into a multi-week STEM unit.
Student assessment rubric
| Criterion | Developing | Proficient | Advanced |
|---|---|---|---|
| Prediction | States an outcome | Predicts an outcome with a scientific reason | Links the prediction to a model of energy transfer |
| Method | Follows a supplied method | Identifies variables and records repeatable steps | Justifies controls, repeats and measurement choices |
| Data | Records basic observations | Records measurements with units and a suitable graph | Processes data, identifies uncertainty and compares trials |
| Explanation | Names energy forms | Traces transfers and transformations using evidence | Explains useful output, other pathways and limitations |
| Evaluation | Suggests a general improvement | Identifies a specific limitation and practical improvement | Uses results to justify and evaluate a tested redesign |
Teachers can score each criterion on a three-point scale or adapt the descriptors to the school’s reporting system.
Differentiating the activities
Foundation level
Provide the apparatus, connection diagram and energy words. Students sequence energy cards, identify inputs and outputs and record visible changes.
Intermediate level
Provide the investigation question, but ask students to identify variables, create the table and select a suitable graph.
Extension level
Ask students to choose measurement ranges, calculate electrical power, estimate efficiency, discuss uncertainty and justify a design improvement using data.
Mixed-ability groups can assign roles such as equipment manager, circuit builder, recorder, safety checker and analyst, then rotate them across lessons.
Understanding efficiency and energy losses
Efficiency compares useful output energy with total input energy:
Efficiency (%) = useful output energy ÷ total input energy × 100
Classroom apparatus rarely makes every energy quantity easy to measure, so students must distinguish calculated efficiency from qualitative evaluation.
They can still identify likely pathways for non-useful output:
- friction warms moving components
- electrical resistance warms wires and coils
- motors and gears produce sound
- moving parts push air
- light spreads away from a solar panel
- batteries and electronic components have conversion losses
The word “lost” can mislead students. Energy has not disappeared; it has transferred into forms or locations that do not contribute to the intended output.
Troubleshooting classroom energy experiments
| Problem | Likely cause | Practical check |
|---|---|---|
| Solar output remains weak | Low light, poor panel angle, shading or excessive load | Face the panel towards a suitable light source, remove shade and test voltage before reconnecting the load |
| Motor hums or fails to start | Insufficient starting current, friction or a poor connection | Disconnect power, check that the shaft turns freely and inspect every connection |
| LED does not illuminate | Reversed polarity, low voltage or an open circuit | Reverse the LED connection where appropriate and test the source and leads separately |
| Meter reading changes rapidly | Variable crank or wind speed, loose contact or unsuitable range | Stabilise the input, secure connections and select an appropriate range |
| Current reads zero | Incorrect lead socket, open circuit or blown meter fuse | Disconnect the circuit and have the teacher check the meter setup and fuse |
| Results differ between groups | Uncontrolled distance, angle, load or timing | Standardise the method and repeat each measurement |
Classroom planning and safety
Energy experiments need clear operating limits even when they use low-voltage equipment.
- Inspect leads, connectors, battery holders and moving parts before each class.
- Use only the intended low-voltage sources and compatible loads.
- Never connect classroom kits directly to mains electricity.
- Prevent short circuits across batteries and generators.
- Disconnect power before changing meter functions or circuit arrangements.
- Keep hair, fingers, clothing and loose objects clear of blades, pulleys and gears.
- Place solar panels and lamps so students do not look into intense light.
- Monitor lamps for heat and protect plastic parts from overheating.
- Store modules in labelled compartments and count components after each lesson.
- Follow product instructions and the school’s risk-assessment procedures.
Before students measure current, confirm the meter’s lead sockets, function and range. Incorrectly connecting a meter in current mode directly across a source can create a short circuit.
Choosing equipment for the learning goal
| Teaching need | Recommended starting point |
|---|---|
| Compare several energy sources and outputs | Energy Conversion Kit |
| Demonstrate mechanical-to-electrical conversion clearly | Hand Held DC Generator |
| Add voltage, current and power measurements | Economy Digital Multimeter |
| Investigate work, stored gravitational energy and recovery | IEC Motor/Generator Kit with Pulley |
| Build and examine an electric motor | IEC Hodson Electric Motor Kit |
| Extend into solar engineering models | 6-in-1 Solar Model Kit or Solar Rover Kit |
| Create a more complex solar design challenge | 12-in-1 Solar Hydraulic Robot Kit |
Schools purchasing class sets should also consider storage, replacement leads, measurement equipment and whether every group needs the same apparatus. One teacher demonstration unit can introduce a concept, but group sets give students more time to test, measure and improve their own systems.
For quantitative group work, add the Economy Digital Multimeter and compatible stackable 4mm test leads to each measurement station.
Common teaching mistakes
Showing only the successful output
An illuminated LED attracts attention, but the learning comes from tracing the complete pathway and discussing every output.
Changing several variables together
Moving a solar panel closer while also changing its angle prevents students from identifying which factor caused the result.
Treating voltage as total energy
Voltage alone does not show stored energy or delivered power. Introduce current and time when the investigation requires a fuller comparison.
Calling renewable energy unlimited
Renewable sources replenish naturally, but their available power varies with conditions. Equipment, land, storage and distribution also impose constraints.
Asking students to calculate efficiency without sufficient data
If the activity does not measure both input and useful output energy, frame the task as identifying losses or comparing performance—not calculating a precise efficiency value.
Frequently asked questions
What is a simple example of energy transformation?
A hand generator transforms mechanical energy into electrical energy. Connecting an LED then transforms some electrical energy into light and thermal energy.
What year level studies energy transformations?
Energy concepts develop across the Australian Curriculum. Year 8 content descriptor AC9S8U05 specifically addresses kinetic and potential energy and energy transfers and transformations in simple systems. Teachers should confirm the curriculum requirements that apply in their state, sector and course.
What is the difference between power and energy?
Energy describes the capacity to cause change or perform work. Power describes how quickly energy transfers or transforms. A device can deliver high power for a short time without transferring a large total amount of energy.
Can a DC motor work as a generator?
Many small permanent-magnet DC motors can generate voltage when an external force turns the shaft. Their efficiency and output depend on motor design, speed and load.
Why does a solar-powered motor slow down when the panel angle changes?
Changing the panel’s orientation can reduce the light reaching it and therefore reduce its electrical output. Light intensity, distance, shading, panel characteristics and motor load also affect performance.
Does the battery create energy?
No. A battery stores chemical potential energy and transforms it into electrical energy during discharge. Charging transfers energy into the battery and stores part of it chemically.
Final recommendation
The strongest energy lesson does more than show that a device works. It asks students to explain the pathway, measure the system, identify uncertainty and improve the result.
Begin with the Energy Conversion Kit to compare wind, solar, hand-crank and stored-energy sources. Add a student multimeter when students are ready to replace qualitative comparisons with numerical evidence. Extend the unit with IEC motor-generator apparatus or solar construction projects when the learning goal shifts towards work, efficiency and engineering design.
This progression takes students from seeing energy change to measuring, explaining and improving an energy system.
Explore STEM kits and practical science equipment at Wiltronics.
© Electrotech Brands Pty Ltd 2026
Write a Comment
You must be logged in to post a comment.