

Teaching Sound and Waves: 6 Hands-On Classroom Experiments
October 22, 2026

Teaching Sound and Waves: 6 Hands-On Classroom Experiments
Sound is something students experience constantly, but the physics behind it can be difficult to visualise.
We hear a tuning fork, musical instrument or loudspeaker because something is vibrating. Those vibrations transfer energy through a medium, producing waves that can be described in terms of frequency, wavelength, amplitude and speed.
The challenge in the classroom is turning those ideas into something students can see, measure and investigate.
At Wiltronics, we supply sound and wave equipment for Australian schools, laboratories and physics classrooms. In this guide, we explore six hands-on activities that progress from simple vibrations and tuning forks through to resonance, standing waves and advanced wave demonstrations.
What Is a Sound Wave?
Sound begins with vibration.
When an object vibrates, it can cause particles in the surrounding medium to oscillate. In air, these disturbances propagate mainly as longitudinal pressure waves, with regions of compression and rarefaction travelling away from the source.
Several important quantities help describe a wave:
Frequency is the number of cycles occurring each second and is measured in hertz (Hz).
Wavelength is the distance between corresponding points on successive waves.
Amplitude describes the magnitude of the oscillation.
Wave speed describes how quickly the disturbance travels through the medium.
For audible sound, increasing frequency is generally perceived as an increase in pitch. Amplitude is related to sound level, although human perception of loudness is more complex than simply saying that amplitude equals loudness.
Practical demonstrations allow students to connect these terms with observations rather than treating them as definitions to memorise.
1. Make Vibrations Visible With a Tuning Fork
Learning goal:
Connect vibration with sound and compare different frequencies.
Equipment:
- tuning forks
- rubber mallet
- container of water for an optional demonstration
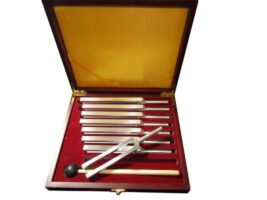
Wiltronics supplies the Tuning Fork Aluminium Alloy Set of 8 with Rubber Mallet – MS0578-01, providing a range of frequencies for classroom comparison.
Activity
Strike one tuning fork gently with the supplied rubber mallet and listen to the sound.
Ask students:
- What is physically moving?
- Can you see the vibration?
- What happens to the sound as the vibration decreases?
- How does a different tuning fork compare?
For a more visible demonstration, a vibrating tuning fork can be brought carefully into contact with the surface of water in a suitable container.
Students can observe the water responding to the vibrating fork.
The important idea is simple:
The tuning fork is producing sound because it is vibrating.
Compare frequencies
Repeat the activity using tuning forks of different frequencies.
Ask students to arrange them from lowest to highest perceived pitch before checking their labelled frequencies.
This creates an immediate connection between:
higher frequency → higher pitch
and
lower frequency → lower pitch
Avoid striking tuning forks against hard surfaces, which can damage the fork or produce uncontrolled impacts. Use the appropriate mallet and follow the equipment instructions.
2. Demonstrate Resonance With Matching Tuning Forks
Hearing a tuning fork vibrate after it has been struck is straightforward.
Seeing another tuning fork begin to respond without being struck directly introduces a much more interesting idea: resonance.
Equipment:
- matched tuning forks
- resonance boxes
- suitable hammer or mallet
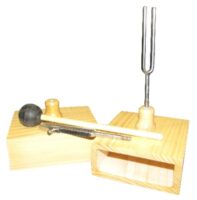
The Tuning Forks on Resonance Boxes – 2 × 426.6 Hz with Hammer, MS0598-01 provide a simple classroom demonstration of resonance and energy transfer.
Activity
Position the two matching tuning fork and resonance-box assemblies according to their instructions.
Strike one tuning fork.
Allow students to observe what happens to the second system.
The demonstration provides an opportunity to discuss resonance: a system can respond strongly when it is driven at or near one of its natural frequencies.
Ask students:
- Why are the tuning forks matched to the same frequency?
- Would the effect be the same with a very different frequency?
- What role does the resonance box play?
- Where is the energy coming from?
This activity helps move students beyond the idea that sound simply travels from a source to an ear.
Sound waves can also transfer energy to another physical system.
3. Compare Transverse and Longitudinal Waves
Sound in air is commonly represented on graphs with an up-and-down line.
That can create a misconception that air particles themselves travel through the room in that same transverse shape.
A long spring gives students a much clearer way to distinguish different types of wave motion.
Equipment:
- wave demonstration spring set
- clear floor area
- two participants
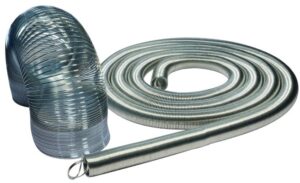
The IEC Wave Demonstration Spring Set – SW4260-001 includes two different springs and can be extended across a classroom for demonstrations of transverse and longitudinal wave motion.
Activity A: Transverse Pulse
Stretch the appropriate spring across the floor without overextending it.
Move one end briefly sideways.
Students should be able to observe a pulse travelling along the spring while sections of the spring move perpendicular to the direction in which the pulse travels.
Activity B: Longitudinal Pulse
Using the appropriate spring, compress a short section along its length and release it.
Students can observe the disturbance travelling in the same general direction as the displacement of the spring coils.
This is a useful physical model for introducing the compressions and rarefactions associated with sound travelling through air.
Extend the Investigation
Students can explore:
- reflection from an end
- pulse speed
- interference
- standing-wave patterns
- changes caused by different boundary conditions
Important Distinction
The spring itself does not travel from one end of the room to the other.
The disturbance and energy travel through the system while individual sections oscillate around their positions.
That distinction is fundamental to understanding waves.
4. Investigate Resonance in an Air Column
A resonance tube provides another way to investigate the relationship between frequency, wavelength and the dimensions of a vibrating air column.
Equipment:
- resonance tube
- suitable loudspeaker
- signal source
- ruler or integrated measurement scale where appropriate
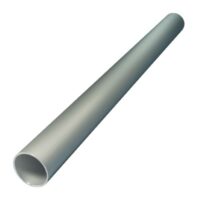
The IEC Resonance Tube – SW3040-001 is a 600 mm long aluminium tube designed for studying resonance, frequency and air-column length using a loudspeaker.
Activity
Set up the resonance tube with the appropriate sound source according to its instructions.
Choose a suitable frequency and investigate how strongly the air column responds under different conditions.
Students can compare:
- frequency
- resonant response
- effective air-column length
The activity provides a practical route into understanding why pipes, wind instruments and other air columns produce particular resonant frequencies.
Ask students:
- Why are some frequencies amplified more strongly than others?
- What is special about the air column at resonance?
- What happens if the frequency changes?
- How might changing the tube length affect its resonant frequency?
For students ready for a quantitative extension, resonance measurements can be related to wavelength and the speed of sound using the appropriate model for the tube arrangement.
The emphasis should remain on matching the mathematical model to the actual experimental setup.
5. Make Standing Waves Visible With Chladni Plates
Some of the most striking demonstrations in wave physics come from making patterns that are normally invisible.
Chladni plates do exactly that.
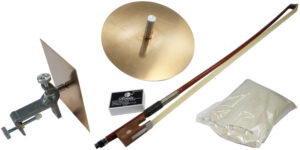
The IEC Chladni’s Plates Set of 2 with Violin Bow and Sand – SW0855-001 allows students to observe characteristic nodal patterns formed when a plate vibrates in particular modes.
Equipment:
- Chladni plate
- suitable support
- violin bow
- supplied demonstration sand
Activity
Prepare the plate according to the manufacturer’s instructions.
Apply a small, suitable quantity of the supplied sand and excite the plate using the bow.
At appropriate resonant modes, the sand migrates away from strongly vibrating regions and accumulates around areas with very little movement.
These are nodal regions.
The resulting geometric patterns give students a visible representation of standing-wave behaviour.
Ask students:
- Why does the sand move?
- Why does it collect in particular places?
- Why does changing how the plate vibrates create a different pattern?
- Are all parts of the plate vibrating with the same amplitude?
Chladni patterns provide a memorable demonstration of a sophisticated idea:
resonance does not simply make an entire object move uniformly.
Different vibrational modes produce different arrangements of nodes and antinodes.
6. Explore Standing Sound Waves With Kundt’s Apparatus
For senior physics or more advanced wave studies, Kundt’s apparatus provides a structured way to investigate resonance and standing sound waves.
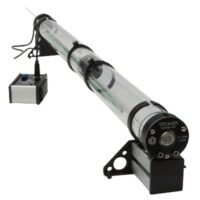
The IEC Kundt’s Apparatus – SW1996-001 includes a transparent resonance tube, adjustable piston, miniature microphone, mini-speaker and metric scale.
It is designed for investigations involving:
- sound
- resonance
- standing waves
- musical tones
- instrument acoustics
A compatible signal generator is required to drive the apparatus.
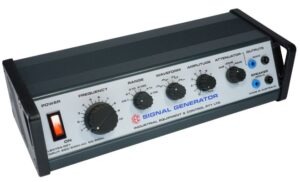
The IEC Signal Generator 0.1 Hz–100 kHz High Power – LB3754-001 is suitable for driving loudspeakers and other electromechanical demonstrations in classroom physics experiments.
Investigation
Students can vary the generated frequency and the effective resonating conditions in the tube.
Depending on the experiment and detection method, they can identify positions associated with stronger and weaker sound responses.
This opens the door to more detailed investigation of:
- nodes and antinodes
- wavelength
- frequency
- resonance
- speed of sound
An oscilloscope or suitable amplifier can also be incorporated where appropriate for the experiment.
Why This Is Valuable
The apparatus allows students to connect several concepts that are often taught separately.
Frequency is no longer just a number on a signal generator.
Wavelength is no longer just a labelled distance in a diagram.
Resonance becomes an experimental condition students can find, alter and analyse.
Bonus Investigation: Explore Vibrating Strings With a Sonometer
Sound does not begin only with air columns and tuning forks.
Strings provide another excellent example of a vibrating system.
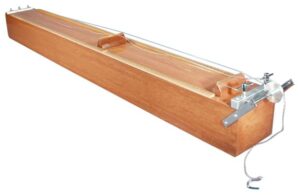
The Hollow Wood Sonometer – MS0418-01 provides a one-metre experimental platform for investigating relationships between vibrating strings and the sounds they produce.
Students can explore how the behaviour of a vibrating string changes with variables such as:
- vibrating length
- tension
- string properties
- frequency
This can provide an excellent link between physics and musical instruments.
Students can begin by predicting what will happen to pitch when the effective vibrating length becomes shorter, then test the prediction experimentally.
The objective is not simply to create different notes.
It is to identify which physical variable changed and explain why the vibration changed with it.
From Vibration to Standing Waves: A Suggested Lesson Sequence
Sound and wave activities work particularly well when each investigation adds one new idea.
Step 1 — Establish Vibration
Use the Tuning Fork Set of 8 to show that a sound source is physically vibrating.
Step 2 — Compare Frequency and Pitch
Compare differently rated tuning forks and relate their marked frequencies to perceived pitch.
Step 3 — Introduce Resonance
Use the Tuning Forks on Resonance Boxes to demonstrate sympathetic vibration and resonance.
Step 4 — Separate Wave Motion From Particle Motion
Use the IEC Wave Demonstration Spring Set to compare transverse and longitudinal disturbances.
Step 5 — Investigate Resonating Air Columns
Move to the IEC Resonance Tube.
Step 6 — Introduce Standing-Wave Patterns
Use the IEC Chladni Plates or IEC Kundt’s Apparatus to explore resonance and standing waves in greater depth.
Students then encounter a progression:
vibration → frequency → wave propagation → resonance → standing waves
rather than learning each term in isolation.
Common Sound and Wave Misconceptions
“The particles travel with the wave.”
Not generally.
When a wave propagates through a medium, particles typically oscillate around their equilibrium positions while energy is transferred through the system.
The long-spring demonstration is particularly useful for making this distinction visible.
“Higher frequency means louder sound.”
Frequency and sound level are different quantities.
Increasing frequency changes pitch under typical audible conditions. Changing amplitude can affect sound level.
“A standing wave is not moving at all.”
A standing-wave pattern contains regions of consistently low amplitude called nodes and regions of larger oscillation called antinodes.
The pattern may appear stationary even though the medium is oscillating.
“Resonance just means something gets louder.”
A stronger sound may be an observable result, but resonance is fundamentally a strong response of a system when driven near one of its natural frequencies.
Practical Classroom Tips
Keep sound demonstrations at appropriate levels and avoid unnecessary high-volume exposure, particularly when using electrically driven loudspeakers or resonance apparatus.
Strike tuning forks only with suitable mallets or approved surfaces.
Give springs plenty of clear space and prevent students from overstretching them.
Secure experimental apparatus before excitation.
For quantitative experiments, change one variable at a time.
Ask students to make a prediction before each change.
And most importantly, encourage students to explain the physical evidence they actually observed rather than modifying results to fit the expected answer.
Frequently Asked Questions
What is the easiest sound experiment for a classroom?
A tuning fork is an excellent starting point. Students can hear the sound, investigate the vibrating fork and compare tuning forks of different frequencies. The Wiltronics Tuning Fork Set of 8 provides multiple frequencies for comparison.
What is the relationship between frequency and pitch?
For a simple audible tone, a higher frequency is generally perceived as a higher pitch and a lower frequency as a lower pitch.
Are sound waves transverse or longitudinal?
Sound waves travelling through air are longitudinal pressure waves. Other wave systems can behave differently, which is why the IEC Wave Demonstration Spring Set is useful for comparing longitudinal and transverse wave behaviour.
What is resonance?
Resonance occurs when a system responds strongly to a driving frequency at or near one of its natural frequencies.
What is a standing wave?
A standing wave is a wave pattern produced by the superposition of waves travelling in opposite directions. It contains nodes, where the amplitude is very small, and antinodes, where the oscillation is larger.
What do Chladni plates demonstrate?
Chladni plates make standing-wave patterns visible. Fine material moves away from strongly vibrating regions and collects around nodal lines, creating characteristic geometric patterns.
What does a resonance tube demonstrate?
The IEC Resonance Tube allows students to investigate how the resonance of an air column relates to frequency, wavelength and the dimensions of the air column.
What is Kundt’s apparatus used for?
IEC Kundt’s Apparatus can be used for studying sound waves, resonance and standing-wave behaviour in a tube, supporting more advanced investigations involving wavelength, frequency and the speed of sound.
What does a sonometer demonstrate?
A sonometer allows students to investigate the relationship between the properties of a vibrating string and its frequency. Variables such as string length, tension and mass per unit length can be changed and compared experimentally.
Why use a wave spring when teaching sound?
A long spring gives students a large-scale physical model of wave propagation. It can demonstrate pulses, reflection, standing waves and the distinction between transverse and longitudinal disturbances.
Where can Australian schools buy sound and wave experiment equipment?
Wiltronics supplies tuning forks, resonance equipment, wave demonstration springs, Chladni plates, Kundt’s apparatus, sonometers, signal generators and other physics equipment for schools, laboratories and educational institutions across Australia.
Browse the Wiltronics Waveforms & Sound range
Make Waves Visible
Sound becomes much easier to understand when students can see the physics behind it.
Start with a vibrating tuning fork. Show a disturbance travelling along a spring. Find resonance in an air column. Create a standing-wave pattern on a Chladni plate.
Each activity reveals another part of the same story:
vibrations transfer energy through waves, and those waves behave in predictable ways.
By progressing from simple observations to controlled experiments, teachers can turn an everyday phenomenon into a rich investigation of frequency, wavelength, resonance and energy transfer.
© Electrotech Brands Pty Ltd 2026
Write a Comment
You must be logged in to post a comment.