

Teaching Series and Parallel Circuits: A Practical Classroom Guide
October 6, 2026
Teaching Series and Parallel Circuits: A Practical Classroom Guide
A lamp lighting up is a useful starting point for an electricity lesson. The deeper learning begins when students can explain why it lights, predict what will happen when the circuit changes and test their predictions.
Series and parallel investigations connect circuit diagrams with working equipment. They also reveal common misconceptions, such as the idea that the first lamp “uses up” the current.
At Wiltronics, our electricity equipment range includes teaching kits, lamp holders and replacement components for practical circuit work. This guide provides an introductory activity sequence, with optional measurement tasks for students ready to investigate voltage and current.
Start with one working lamp circuit, compare two identical lamps in series and parallel, then use observations and measurements to explain the differences.
Adapt the activities to your students’ prior knowledge, equipment instructions and school procedures.
1. Establish the difference before building
Students need to identify electrical connections rather than memorise the appearance of a drawing.
| Feature | Series circuit | Parallel circuit |
|---|---|---|
| Arrangement | Components share one path | Components occupy separate branches between common connection points |
| Current | The same current passes through each component | Current divides between branches |
| Voltage | Component voltage drops add to the supply voltage | Each branch has the same voltage across it |
| Opening the circuit | A break stops current around the single path | A break in one branch can leave other branches operating |
For parallel circuits, distinguish between opening one branch and disconnecting a shared supply connection. A break in the shared connection can stop every branch.
These relationships provide the basis for students’ predictions and measurements. www.physicsclassroom.com
2. Prepare a consistent equipment set
For an introductory two-lamp investigation, each group needs:
- A suitable low-voltage DC source.
- Two filament lamps with matching voltage and current or power ratings.
- Compatible lamp holders.
- Enough leads and suitable junction connections for both arrangements.
- A switch, if included in the planned circuit.
- Circuit diagrams and a recording sheet.
- Suitable meters for the optional measurement extension.
Choose the supply voltage to suit a single lamp, because each lamp in the parallel arrangement receives the voltage across the supply.
Two lamps with the same fitting are not necessarily electrically identical. Check their ratings before distributing them.
We recommend testing the complete setup before the lesson. Confirm that the source can supply the combined current required by the parallel branches and that students can identify each connection clearly.
Use the equipment according to its instructions and your school’s procedures. Disconnect power before rewiring, avoid short circuits and remember that filament lamps can become hot.
3. Activity one: establish a working baseline
Ask students to build a circuit containing the source, one lamp and, where used, a switch.
Before switching on, have them trace the complete path from one source terminal, through the lamp and back to the other terminal.
Students should record:
- A circuit diagram.
- Whether the lamp lights.
- The effect of opening the switch.
- An explanation of why a complete path is needed.
If the lamp does not light, resolve the fault before adding components. A working baseline makes later comparisons more useful.
Teaching prompt: “Which connections must remain in place for current to pass through the lamp?”
4. Activity two: add a second lamp in series
Disconnect the supply and add a second identical lamp in the same path. Keep the supply setting unchanged.
Ask students to predict:
- Will both lamps light?
- Will they have similar brightness?
- How will their brightness compare with the single-lamp circuit?
- What will happen if the path is opened at either lamp?
With the same supply voltage, two identical filament lamps in series will generally be dimmer than a single lamp. Both carry the same current; the first lamp does not consume current before it reaches the second.
Have students compare observations with predictions and explain any differences.
Avoid asking for an exact brightness fraction. Filament resistance changes with temperature, so a lamp is not a fixed-resistance component.
5. Activity three: build two parallel branches
Disconnect power and rearrange the circuit so each lamp has its own branch across the same two supply connection points.
Ask students to trace each complete path separately. Two lamps positioned beside each other are only electrically parallel if their connections form the required branches.
Then ask students to predict:
- How will brightness compare with the single-lamp baseline?
- What will happen when one branch is opened?
- Will the source supply more or less total current?
With a source that maintains its voltage, each parallel lamp should operate approximately as it did alone. Total supply current increases because the source supplies both branches. Battery voltage drop or a supply reaching its current limit can affect the practical result.
If using a switch to control one lamp independently, place it within that lamp’s branch. A switch in the shared supply path controls both branches.
Teaching prompt: “When one branch is opened, can you still trace a complete path through the other lamp?”
6. Turn observations into evidence
Use a recording table throughout the sequence.
| Circuit | Prediction | Observation | Explanation using circuit paths |
|---|---|---|---|
| One lamp | |||
| Two lamps in series | |||
| Series circuit with one break | |||
| Two lamps in parallel | |||
| Parallel circuit with one branch open |
Keep the lamps and supply conditions consistent so students can explain the effect of changing the connections.
For students ready to measure, extend the investigation with voltage and current readings:
- Connect a voltmeter across the component being measured.
- Connect an ammeter in series with the path whose current is being measured.
- Check the meter sockets, function and range before applying power.
- Never connect a meter set to measure current directly across the source.
Useful comparisons include current at different positions in a series circuit and total current versus branch currents in a parallel circuit.
Treat differences between readings as something to investigate. Connections, source behaviour and measurement limitations can influence the results.
7. Wiltronics equipment highlights
IEC Standard Electricity Kit: support a broader electricity program
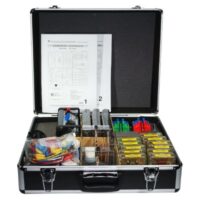
Our IEC Standard Electricity Kit in Aluminium Case—EM1763-001 includes housed components with 4mm banana connections, a 5A power supply, three digital meters, cables and an experiment book.
It supports a broader range of DC and AC investigations, making it worth considering when introductory circuit lessons form part of a longer electricity program.
Follow its experiment instructions when selecting components and settings. The supply’s maximum current capability is not a recommended current for every activity.
IEC Circuits Kit: a compact starting point
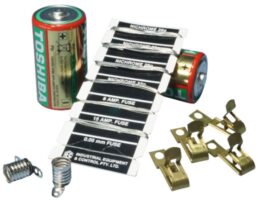
Our IEC Circuits Kit—EM0970-001 contains two small lamps with sockets, two dry cells, four Fahnstock clips and a selection of copper and resistance wires.
It provides apparatus for basic electrical investigations. Check the instructions and connections required for your selected activity before preparing group sets.
This differs from the Standard Electricity Kit. Compare the contents with your teaching requirements rather than treating the two kits as interchangeable.
MES Lampholder with PVC Base: build reusable stations
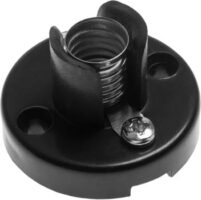
Our MES Lampholder with PVC Base—LA5100 accepts Miniature Edison Screw lamps.
It uses screw connections for wires, requires no soldering and can be screwed to a base plate.
For teachers assembling individual stations, it provides a way to secure lamps while keeping their connections accessible. Match the lamp ratings and supply separately; the holder fitting alone does not establish electrical suitability.
IEC replacement lamps: keep voltage ratings separate
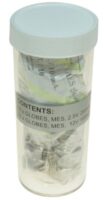
Our IEC Electricity Kit Lamps—PA1763-150 contains ten 2.5V and ten 12V MES lamps in a screw-top vial.
The pack provides replacements for compatible apparatus, but it contains two different voltage ratings. Identify and sort the lamps before preparing a lesson.
For brightness comparisons, select matching lamps and a suitable source. Mixing the two voltage types introduces another variable into the investigation.
IEC spare parts: complete existing teaching sets
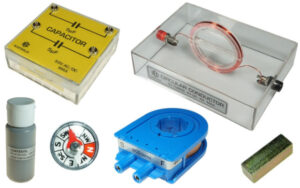
Our IEC Electricity Kit spare parts range supports schools maintaining existing equipment.
Check the kit model and required component before purchasing. Replacing a missing holder or damaged part may restore an otherwise usable teaching set without replacing the whole kit.
8. Common mistakes and practical checks
Disconnect power before inspecting or changing connections.
| Problem | What to check |
|---|---|
| Neither lamp lights | Source, switch position, complete paths and secure contacts |
| Only one intended parallel branch works | Connections and lamp condition in that branch |
| Lamps behave differently | Matching ratings, contacts and actual circuit arrangement |
| Lamps dim when a parallel branch is added | Battery condition, supply voltage and current limiting |
| A lamp fails after rewiring | Supply setting and possible excessive lamp voltage |
| Results change when leads move | Loose terminals or damaged leads |
| A switch turns off both parallel lamps unexpectedly | Whether it sits in the shared supply path |
Encourage students to change one thing at a time. Rebuilding everything at once may restore operation without revealing the cause.
9. Check understanding before packing away
Ask students to:
- Draw two lamps in series and then in parallel.
- Mark a break that turns off both lamps.
- Mark a break that turns off only one parallel lamp.
- Explain why current is not “used up” by the first lamp.
Students should justify their answers by tracing complete paths through the circuit.
For the measurement extension, ask them to use their recorded readings to support one statement about current or voltage.
Frequently asked questions
Which should we teach first: series or parallel circuits?
We recommend starting with one lamp, then adding a second in series before introducing branches. This provides a working baseline and introduces one change at a time.
Why use identical lamps?
Matching voltage and current or power ratings helps make the connection arrangement the main variable. Different lamps can produce different brightness even when the wiring is correct.
Can we substitute LEDs for filament lamps?
LEDs require attention to polarity and current limiting. They are not direct replacements for bare filament lamps. Use a suitable educational LED module or a correctly designed circuit, and adapt the activity accordingly.
Does current get used up by the first lamp?
No. In a steady series circuit, the same current passes through each component. The lamps transfer electrical energy to light and heat.
Why might parallel lamps be dimmer than expected?
Check the source under load. A weak battery, resistive connection or current-limited supply may reduce the voltage available to the lamps.
Do students need meters for the first lesson?
No. Students can begin with predictions, circuit paths and observations. Introduce meters when they are ready to distinguish voltage from current and connect instruments correctly.
Build your next electricity lesson with Wiltronics
Explore our electricity equipment and IEC Electricity Kit spare parts to prepare complete working stations.
Choose equipment that allows students to build, observe and explain, then extend the investigation with measurements as their understanding develops.
© Electrotech Brands Pty Ltd 2026
Write a Comment
You must be logged in to post a comment.