

Magnetic Field Experiments for the Classroom
October 26, 2026
Magnetic Field Experiments for the Classroom
A compass needle turning beside a bar magnet gives students evidence of something they cannot see directly. Moving the compass to a new position reveals another direction. Put those observations together and a magnetic field map begins to take shape.
At Wiltronics, our magnets, compasses and field demonstrators help teachers connect that observation with a useful scientific model. This guide combines equipment choices with two classroom magnetic field experiments: mapping directions around a bar magnet and comparing the patterns produced by two magnets.
Quick answer: Use a compass to investigate field direction at selected positions. Use a sealed iron-filings demonstrator to reveal a broader pattern. Combine the observations to build a labelled diagram, while recognising that neither method directly measures field strength.
Choose equipment for the question
Start with what students need to discover, then choose the apparatus.
| Question | Useful equipment | Evidence to record |
|---|---|---|
| Which way does the field point here? | Bar magnet and compass | Needle direction at marked positions |
| How does the pattern change around a magnet? | Sealed magnetic field demonstrator | Observational sketch of the particle pattern |
| What changes when a second magnet is added? | Two magnets and a suitable demonstrator | Comparison with positions and poles labelled |
A field-line drawing is a model. Outside a bar magnet, arrows conventionally run from its north pole towards its south pole. The north-seeking end of a compass indicates the local field direction. Iron filings show alignment but do not supply those directional arrows on their own.
The field exists throughout the surrounding space, including between the lines drawn on paper. A flat diagram represents only part of a three-dimensional field.
Wiltronics equipment for magnetic field experiments
Alnico bar magnets: a starting point for comparison
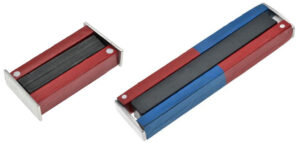
Our Alnico Bar Magnet Low Power Pair with Keeper is available in 50mm, 75mm and 100mm lengths.
A pair supports both a single-magnet investigation and a comparison of different pole arrangements. Choose the size around the available workspace, compass dimensions and demonstrator. Check the selected variation’s supplied accessories and storage instructions.
Do not assume the strongest magnet will produce the best lesson. Students need a setup they can position, observe and repeat without the magnets snapping together or overwhelming the working area.
Aluminium compass: observe direction
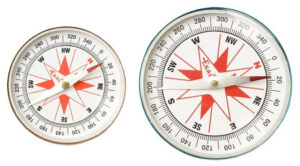
Our Aluminium Compass has a 360-degree scale and is available in 75mm and 100mm diameters.
These sizes suit clear demonstrations and observations at spaced positions. Allow enough paper and bench space for the compass housing. For closely spaced tracing near a small magnet, a smaller plotting compass may be more practical.
A compass provides directional evidence. Its scale should not be treated as a direct magnetic-field-strength meter.
Glycerin-filled magnetic field demonstrator
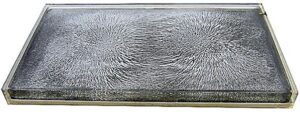
Our Magnetic Field Demonstrator—Glycerin Filled with Iron Filings, EM0603-01 contains iron filings in a sealed transparent acrylic chamber measuring 220 × 120 × 10mm.
The listing describes placing a magnet on top to reveal the particle pattern. It also identifies overhead-projector use for group demonstrations.
The sealed chamber keeps the filings contained during normal use. Check its condition before each lesson, follow the handling instructions and trial the magnet arrangement before students begin. A clear pattern matters more than crowding several magnets onto a small surface.
Prepare the station
Use a flat working surface with paper, a pencil, a ruler, the chosen magnets and a compass. Provide a separate station for the sealed demonstrator if groups will rotate between activities.
Before the lesson:
- Check that the compass needle moves freely and settles consistently.
- Identify the north-seeking end using the instrument’s markings and instructions; do not rely only on colour.
- Remove unused magnets, steel tools and magnetic clasps from the immediate working area.
- Check whether the bench structure affects the compass before placing the experiment magnet nearby.
- Choose age-appropriate magnets and follow the school’s risk assessment and apparatus guidance.
Keep magnets away from mouths and supervise their handling. Avoid letting magnets strike each other or the demonstrator. These activities need no power supply or exposed electrical connections.
Experiment 1: map directions around a bar magnet
Learning goal: use several local observations to construct a field-direction map.
- Place one bar magnet on a large sheet of paper. Trace its outline and label its north and south poles.
- Mark several observation positions around the magnet, leaving enough space for the compass body at each position.
- Place the centre of the compass over the first position, keeping the magnet fixed.
- Wait for the needle to settle. Record the direction of its north-seeking end as an arrow associated with that position.
- Repeat at the remaining positions, using the same end of the needle each time.
- Remove the equipment and compare the arrows. Where the observations support it, sketch smooth curves that follow their directions.
For a large compass, leave generous gaps between observation positions. This produces a sampled direction map rather than a closely traced set of lines. Do not force a curve through arrows that disagree; check the observations first.
| Position | Arrow direction recorded | Did the needle settle? | Notes |
|---|---|---|---|
| A | |||
| B | |||
| C | |||
| D |
Teaching prompt: “What did we observe directly, and what did we add when we drew the curves?”
The needle directions are observations. The connecting curves represent an interpretation of the field between those observations.
Experiment 2: compare two magnet arrangements
Learning goal: explain how changing the pole arrangement changes the observed pattern.
Begin with one magnet on the sealed demonstrator, following its instructions. Ask students to sketch the pattern and label the magnet’s position.
Next, use two suitable magnets with a controlled gap between their facing ends. Support them so they cannot slide or snap together, without obstructing the viewing area.
- Arrange unlike poles facing across the gap and observe the particle pattern.
- Record the magnet positions, pole labels and a sketch of the gap region.
- Remove the magnets and reset the demonstrator as instructed.
- Reverse one magnet so like poles face across the same gap.
- Compare the new pattern with the first sketch.
Keep the magnet pair, gap and viewing orientation consistent. Change the pole arrangement rather than several variables at once. If the apparatus is too small for a clear two-magnet display, use the compass station for the comparison instead.
Ask students to identify where the patterns differ, then explain how the labelled pole arrangement relates to those differences. Avoid asking them to infer numerical field strength from the appearance of the filings.
Troubleshooting unclear results
| Observation | What to check |
|---|---|
| Compass directions seem inconsistent | Nearby magnets or steel, compass levelling and which needle end was recorded |
| Needle barely changes direction | Magnet distance, compass condition and the influence of the background field |
| Recorded arrows do not form a clear pattern | Magnet movement, observation spacing and recording accuracy |
| Filings remain clustered from an earlier trial | Whether the chamber was reset according to its instructions |
| Two-magnet comparison is hard to interpret | Available space, secure positioning and whether the gap stayed the same |
A compass responds to the combined field at its position, including Earth’s field and nearby magnetic sources. Farther from the experiment magnet, these other influences may become more noticeable.
Keep unexpected observations in the record. Have students propose a specific check and repeat that part of the investigation, rather than replacing the drawing with a remembered textbook pattern.
Quick assessment
Ask students to submit one diagram and three short answers:
- Label the magnet’s poles and add arrows supported by compass observations.
- Explain why the iron-filings pattern alone does not tell you which way to draw the arrows.
- Identify one variable kept consistent in the two-magnet comparison.
- Name one source of interference and describe how to check it.
Look for a clear distinction between an observation, a diagram and an explanation. A neat drawing is useful only if the student can connect it to the evidence.
Frequently asked questions
Do iron filings show the magnetic field itself?
They respond to the field and form a visible alignment pattern. They do not reveal physical strings or boundaries in the space around the magnet.
Does a compass always point north?
Away from local interference it responds mainly to Earth’s magnetic field. Near a bar magnet, its direction can change because the local combined field is different.
Can these activities measure magnetic field strength?
They are primarily qualitative. Quantitative measurements require a suitable magnetic field sensor or meter, with attention to its range, orientation and measurement procedure.
Do I need loose iron filings?
No. A sealed demonstrator provides a contained way to observe particle patterns. Inspect the chamber and use it according to its instructions.
Can I use the same diagram for every magnet?
No. Shape, orientation and nearby magnets affect the pattern. Students should label the actual arrangement they investigated and draw from their observations.
Explore magnetism equipment at Wiltronics
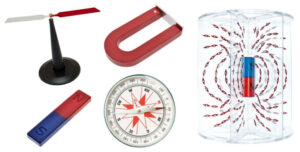
Browse our magnetism equipment range to assemble a station around your teaching goal.
Start with a clear question, record the evidence and use it to explain the diagram. That approach turns a moving compass needle into a practical lesson in how scientific models are built.
© Electrotech Brands Pty Ltd 2026
Write a Comment
You must be logged in to post a comment.